
如果我已经基于Halcon写好了代码,如何用LPV实现类似的功能
1 Answers
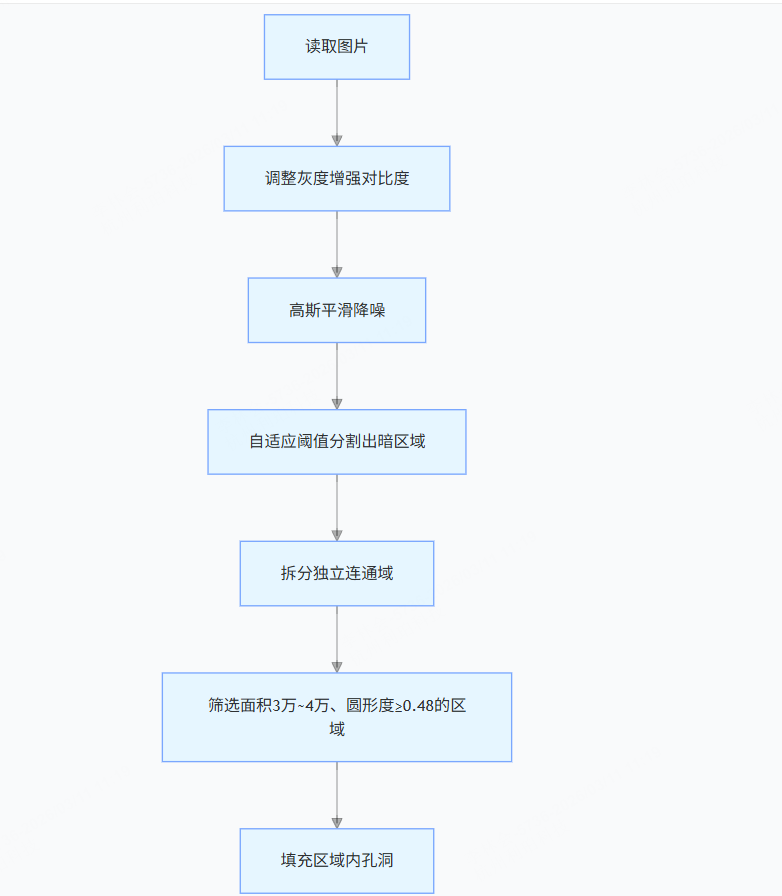
举个样例,比如这个案例的halcon代码如下:
read_image (Image, 'input.jpg')

scale_image_range (Image, ImageScaled, 130, 255)

smooth_image (ImageScaled, ImageSmooth, 'gauss', 10.5)

local_threshold (ImageSmooth, Region, 'adapted_std_deviation', 'dark', ['mask_size', 'scale'], [101, 0.0])

connection(Region, ConnectedRegions)
select_shape (ConnectedRegions, SelectedRegions, ['area', 'circularity'], 'and', [30000, 0.48], [40000, 1])
fill_up (SelectedRegions, RegionFillUp)
先来看看这段代码在做什么,可以用AI帮忙解析
基于此理解,我们来用LPV进行代码实现,先来看看效果
代码段如下:里面有详细代码解释可以参阅
#define LPV_COM
#include "LPVImgProc.h"
#include "LPVBlob.h"
#include "LPVCore.h"
#include "LPVGeom.h"
#include "LPVDisplay.h"
#include <iostream>
#include <windows.h>
#include <objbase.h>
#include <string>
using namespace std;
// 辅助函数:保存图像并显示
void SaveAndDisplayImage(ILImagePtr image, const wstring& filename, const wstring& windowTitle,
ILDisplayPtr& displayCtrl, int x = 0, int y = 0, int width = 800, int height = 600)
{
if (!image || !image->Valid()) {
wcout << L"图像无效,无法保存: " << filename << endl;
return;
}
// 保存图像
image->Save(filename.c_str(), nullptr);
wcout << L"图像已保存为: " << filename << endl;
// 显示图像
if (displayCtrl) {
displayCtrl->SetImage(image);
displayCtrl->ShowDialog(windowTitle.c_str(), x, y, width, height);
}
}
int main() {
// 初始化COM
HRESULT hr = CoInitializeEx(NULL, COINIT_APARTMENTTHREADED);
if (FAILED(hr)) {
std::cerr << "COM初始化失败: " << hr << std::endl;
return -1;
}
try {
// 创建显示控件
ILDisplayPtr displayCtrl = LDisplay::Create();
// ============================================
// 步骤1: 加载原始图像
// ============================================
ILImagePtr originalImg = LImage::Create();
LPVErrorCode err = originalImg->Load(L"C:/Users/leaper/Desktop/2025年11月17日 51halcon 点阵椭圆/2025年11月17日 51halcon 点阵椭圆/input.jpg");
if (err != LPVErrorCode::LPVNoError) {
std::cerr << "图像加载失败" << std::endl;
return -1;
}
// 当前处理图像指针,用于顺序传递
ILImagePtr currentImg = originalImg;
// ============================================
// 步骤2: 归一化处理,输出16位图
// ============================================
ILImageConvertPtr imgConvert = LImageConvert::Create();
ILImagePtr normalized16Img = LImage::Create();
// 使用当前图像(currentImg)作为输入,输出到normalized16Img
imgConvert->NormalizeTo16(currentImg, 0, 0, normalized16Img);
// 检查图像是否有效
if (!normalized16Img || !normalized16Img->Valid()) {
throw std::runtime_error("归一化处理失败 - 输出图像无效");
}
// 更新当前处理图像为归一化后的图像
currentImg = normalized16Img;
//调试用(查看中间结果)
//displayCtrl->SetImage(normalized16Img);
//displayCtrl->ShowDialog(L"测试结果", 0, 0, 1500, 900);
// ============================================
// 步骤3: 图像增强处理 - 低通滤波
// ============================================
ILImageFilterPtr imgFilter = LImageFilter::Create();
ILImagePtr lowpassImg = LImage::Create();
// 设置滤波工具中使用的核尺寸
imgFilter->SetKernelSize(137, 137);
// 使用当前图像(currentImg)作为输入,输出到lowpassImg
imgFilter->Gaussian(currentImg, lowpassImg);
// 检查图像是否有效
if (!lowpassImg || !lowpassImg->Valid()) {
throw std::runtime_error("低通滤波处理失败 - 输出图像无效");
}
// 更新当前处理图像为低通滤波后的图像
currentImg = lowpassImg;
//调试用,查 看中间结果
//displayCtrl->SetImage(lowpassImg);
//displayCtrl->ShowDialog(L"测试结果", 0, 0, 1500, 900);
// ============================================
// 步骤4: 单阈值二值化处理
// ============================================
ILImageThresholdPtr thresholdOp = LImageThreshold::Create();
ILImagePtr binaryImg = LImage::Create();
LPVThresholdType thresholdType = thresholdOp->ThresholdType;
// 设置自适应阈值方式为均值,块尺寸165,偏置5
thresholdOp->SetThresholdAdaptLocalMean(165, 165, 0, 65535);
// 使用当前图像(currentImg)作为输入,输出到binaryImg
thresholdOp->Binarize(currentImg, binaryImg);
// 检查图像是否有效
if (!binaryImg || !binaryImg->Valid()) {
throw std::runtime_error("二值化处理失败 - 输出图像无效");
}
// 更新当前处理图像为二值化后的图像
currentImg = binaryImg;
//调试用,查看中间结果
//displayCtrl->SetImage(binaryImg);
//displayCtrl->ShowDialog(L"测试结果", 0, 0, 1500, 900);
// ============================================
// 步骤5: 再次进行图像归一化处理,输出8U图
// ============================================
ILImagePtr normalized8Img = LImage::Create();
// 使用当前图像(currentImg)作为输入,输出到normalized8Img
imgConvert->NormalizeTo8(currentImg, 0, 0, normalized8Img);
// 检查图像是否有效
if (!normalized8Img || !normalized8Img->Valid()) {
throw std::runtime_error("二次归一化处理失败 - 输出图像无效");
}
// 更新当前处理图像为最终处理后的图像
currentImg = normalized8Img;
// ============================================
// 步骤6: 使用多斑点定位算法
// ============================================
ILBlobAnalysisPtr blobAna = LBlobAnalysis::Create();
// 设置斑点分析参数
blobAna->MaxCount = 33; // 最大数量设置为33
blobAna->ContourType = LPVBlobContourType::LPVBlobContourExternal; // 轮廓类型为外轮廓
blobAna->SortBy = LPVBlobFeatures::LPVBlobArea; // 查找依据为面积
blobAna->SortByDescending = TRUE; // 按面积降序排序
// 设置自适应阈值(黑)
blobAna->AddBlobRange(0, 128); // 假设黑色斑点灰度值较低
// 执行斑点分析,使用当前图像(currentImg)作为输入
ILBlobResultsPtr blobResults;
err = blobAna->Build(currentImg, nullptr, &blobResults);
if (err != LPVErrorCode::LPVNoError) {
throw std::runtime_error("斑点分析失败");
}
// ============================================
// 步骤7: 创建斑点过滤器并设置过滤条件
// ============================================
ILBlobFilterPtr blobFilter = LBlobFilter::Create();
// 设置面积过滤器:100~45000
blobFilter->SetFilterFeature(LPVBlobFeatures::LPVBlobArea, 100, 45000);
// 设置圆度过滤器:0.70~1.0
blobFilter->SetFilterFeature(LPVBlobFeatures::LPVBlobCircularity, 0.70, 1.0);
// 设置凸度过滤器:0.95~1.0
blobFilter->SetFilterFeature(LPVBlobFeatures::LPVBlobConvexity, 0.95, 1.0);
// 应用过滤器
ILBlobResultsPtr filteredResults;
filteredResults = blobFilter->FilterResults(blobResults);
// ============================================
// 步骤8: 输出斑点检测结果
// ============================================
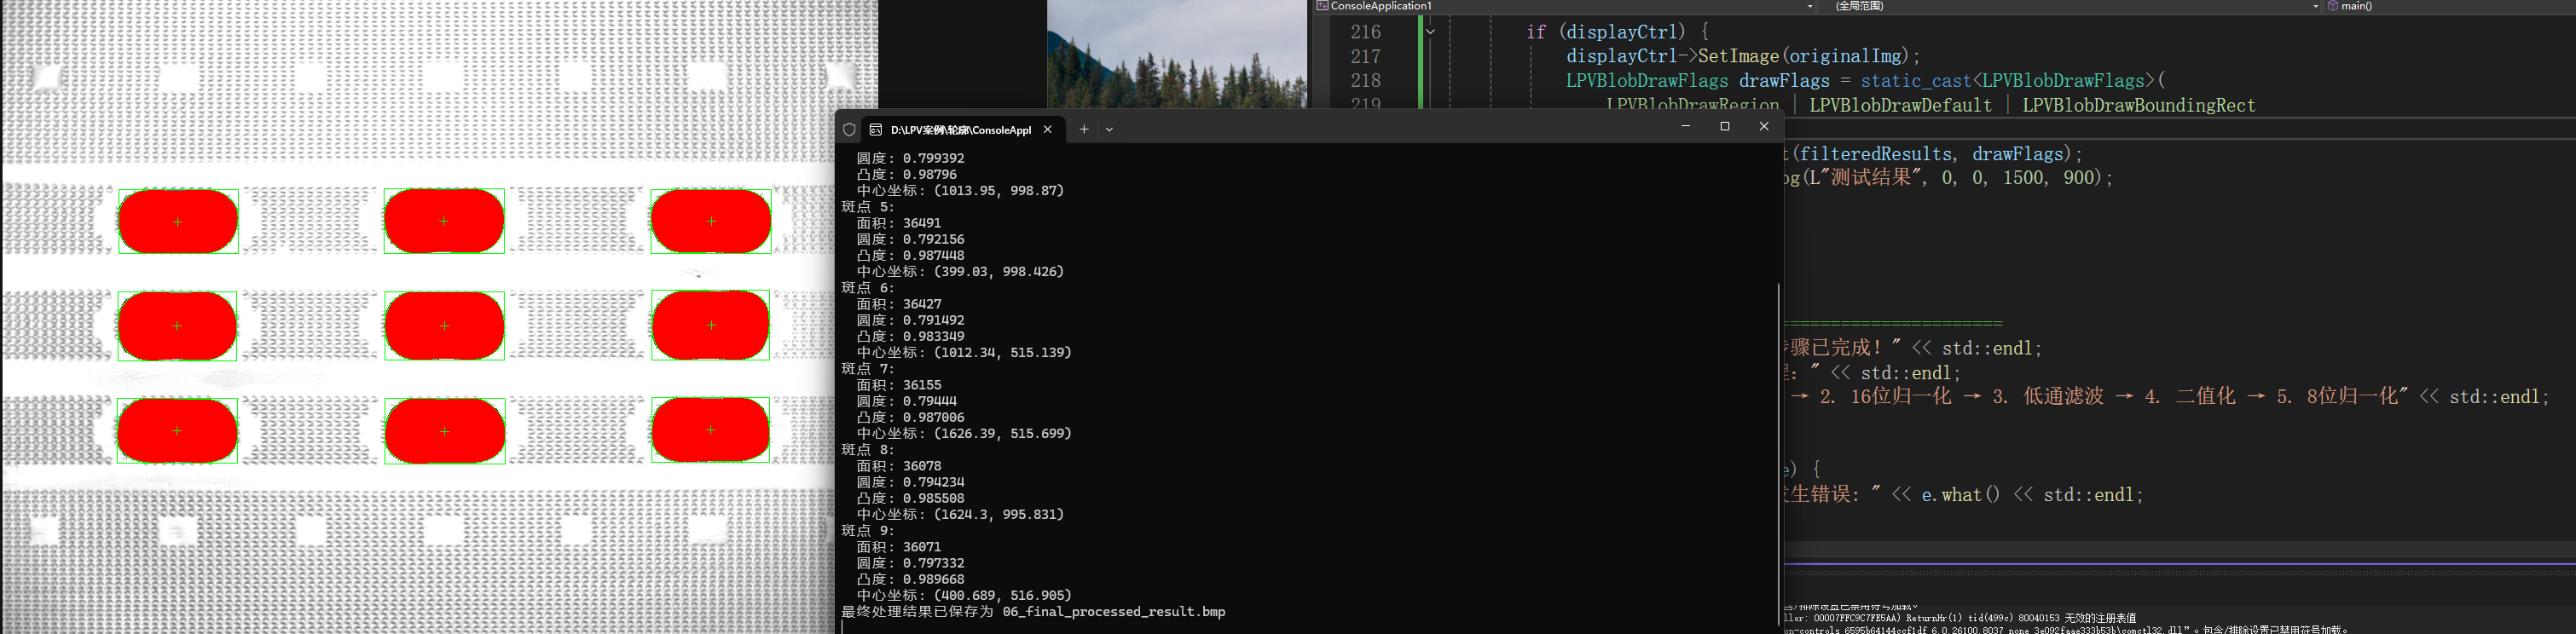
int blobCount = filteredResults->Count();
std::cout << "检测到斑点数量: " << blobCount << std::endl;
for (int i = 0; i < blobCount; ++i) {
ILBlobPtr blob = filteredResults->Item(i);
// 获取斑点特征
double area = blob->GetFeature(LPVBlobFeatures::LPVBlobArea);
double circularity = blob->GetFeature(LPVBlobFeatures::LPVBlobCircularity);
double convexity = blob->GetFeature(LPVBlobFeatures::LPVBlobConvexity);
ILPointPtr center = blob->GetCenter();
std::cout << "斑点 " << i + 1 << ":" << std::endl;
std::cout << " 面积: " << area << std::endl;
std::cout << " 圆度: " << circularity << std::endl;
std::cout << " 凸度: " << convexity << std::endl;
std::cout << " 中心坐标: (" << center->X << ", " << center->Y << ")" << std::endl;
}
// ============================================
// 步骤10: 保存最终处理结果
// ============================================
currentImg->Save(L"06_final_processed_result.bmp", nullptr);
std::cout << "最终处理结果已保存为 06_final_processed_result.bmp" << std::endl;
if (displayCtrl) {
displayCtrl->SetImage(originalImg);
LPVBlobDrawFlags drawFlags = static_cast<LPVBlobDrawFlags>(
LPVBlobDrawRegion | LPVBlobDrawDefault | LPVBlobDrawBoundingRect
);
displayCtrl->AddObject(filteredResults, drawFlags);
displayCtrl->ShowDialog(L"测试结果", 0, 0, 1500, 900);
}
// 输出总结
// ============================================
std::cout << "\n所有处理步骤已完成!" << std::endl;
std::cout << "图像处理流程:" << std::endl;
std::cout << "1. 原始图像 → 2. 16位归一化 → 3. 低通滤波 → 4. 二值化 → 5. 8位归一化" << std::endl;
}
catch (const std::exception& e) {
std::cerr << "处理过程中发生错误: " << e.what() << std::endl;
CoUninitialize();
return -1;
}
// 清理COM
CoUninitialize();
return 0;
}
最后,来运行一下试试吧~
Related